Timeless, design-led interiors, by Sarah-Louise and Christopher Phelps.

Timeless, design-led interiors, by Sarah-Louise and Christopher Phelps.
In the world of design, it’s often the simplest touches that make the most profound impact. Amongst the many challenges of kitchen design, there exists an opportunity to create something truly beautiful, a kitchen marvel: the marble floating shelf.
Achieving the impression of ease and effortlessness in a room is an elusive art, a delicate balance that, when mastered, breathes life and harmony into a space, enhancing the flow of daily life. Beautiful and functional, this impactful addition has the power to transform and open up your kitchen. However, creating and installing a floating marble shelf is an art and takes careful consideration, craftsmanship and planning to achieve a beautiful and structurally sound end result. From fabrication to structural support, installation, height, depth and more, in this chapter we reveal every detail from the design process to the dimensions.
Your kitchen is the beating heart of your home, a central hub to cook, entertain, converse, laugh, dance, drink tea, reflect and everything in between. So when it comes to designing a space you will spend so much time enjoying over the years, every detail should be considered. Functionality should blend seamlessly with beauty, allowing your personality to shine. When designing our kitchen, we drew inspiration from the serene elegance of California homes — light, airy and effortlessly sophisticated. Our brief was to bring this vision to life using beautiful natural materials, stone, oak and brass, each element chosen to create a space that is both timeless and inviting. The only remaining question was, how do we make it an impact. How do we make the space sing? The answer lay in a standout feature: our floating marble shelf. Not just a functional cornerstone of the kitchen, it also serves as a canvas for showcasing decorative and beautiful objects, adding our personality and turning the space into a stage where form and function gracefully coexist.
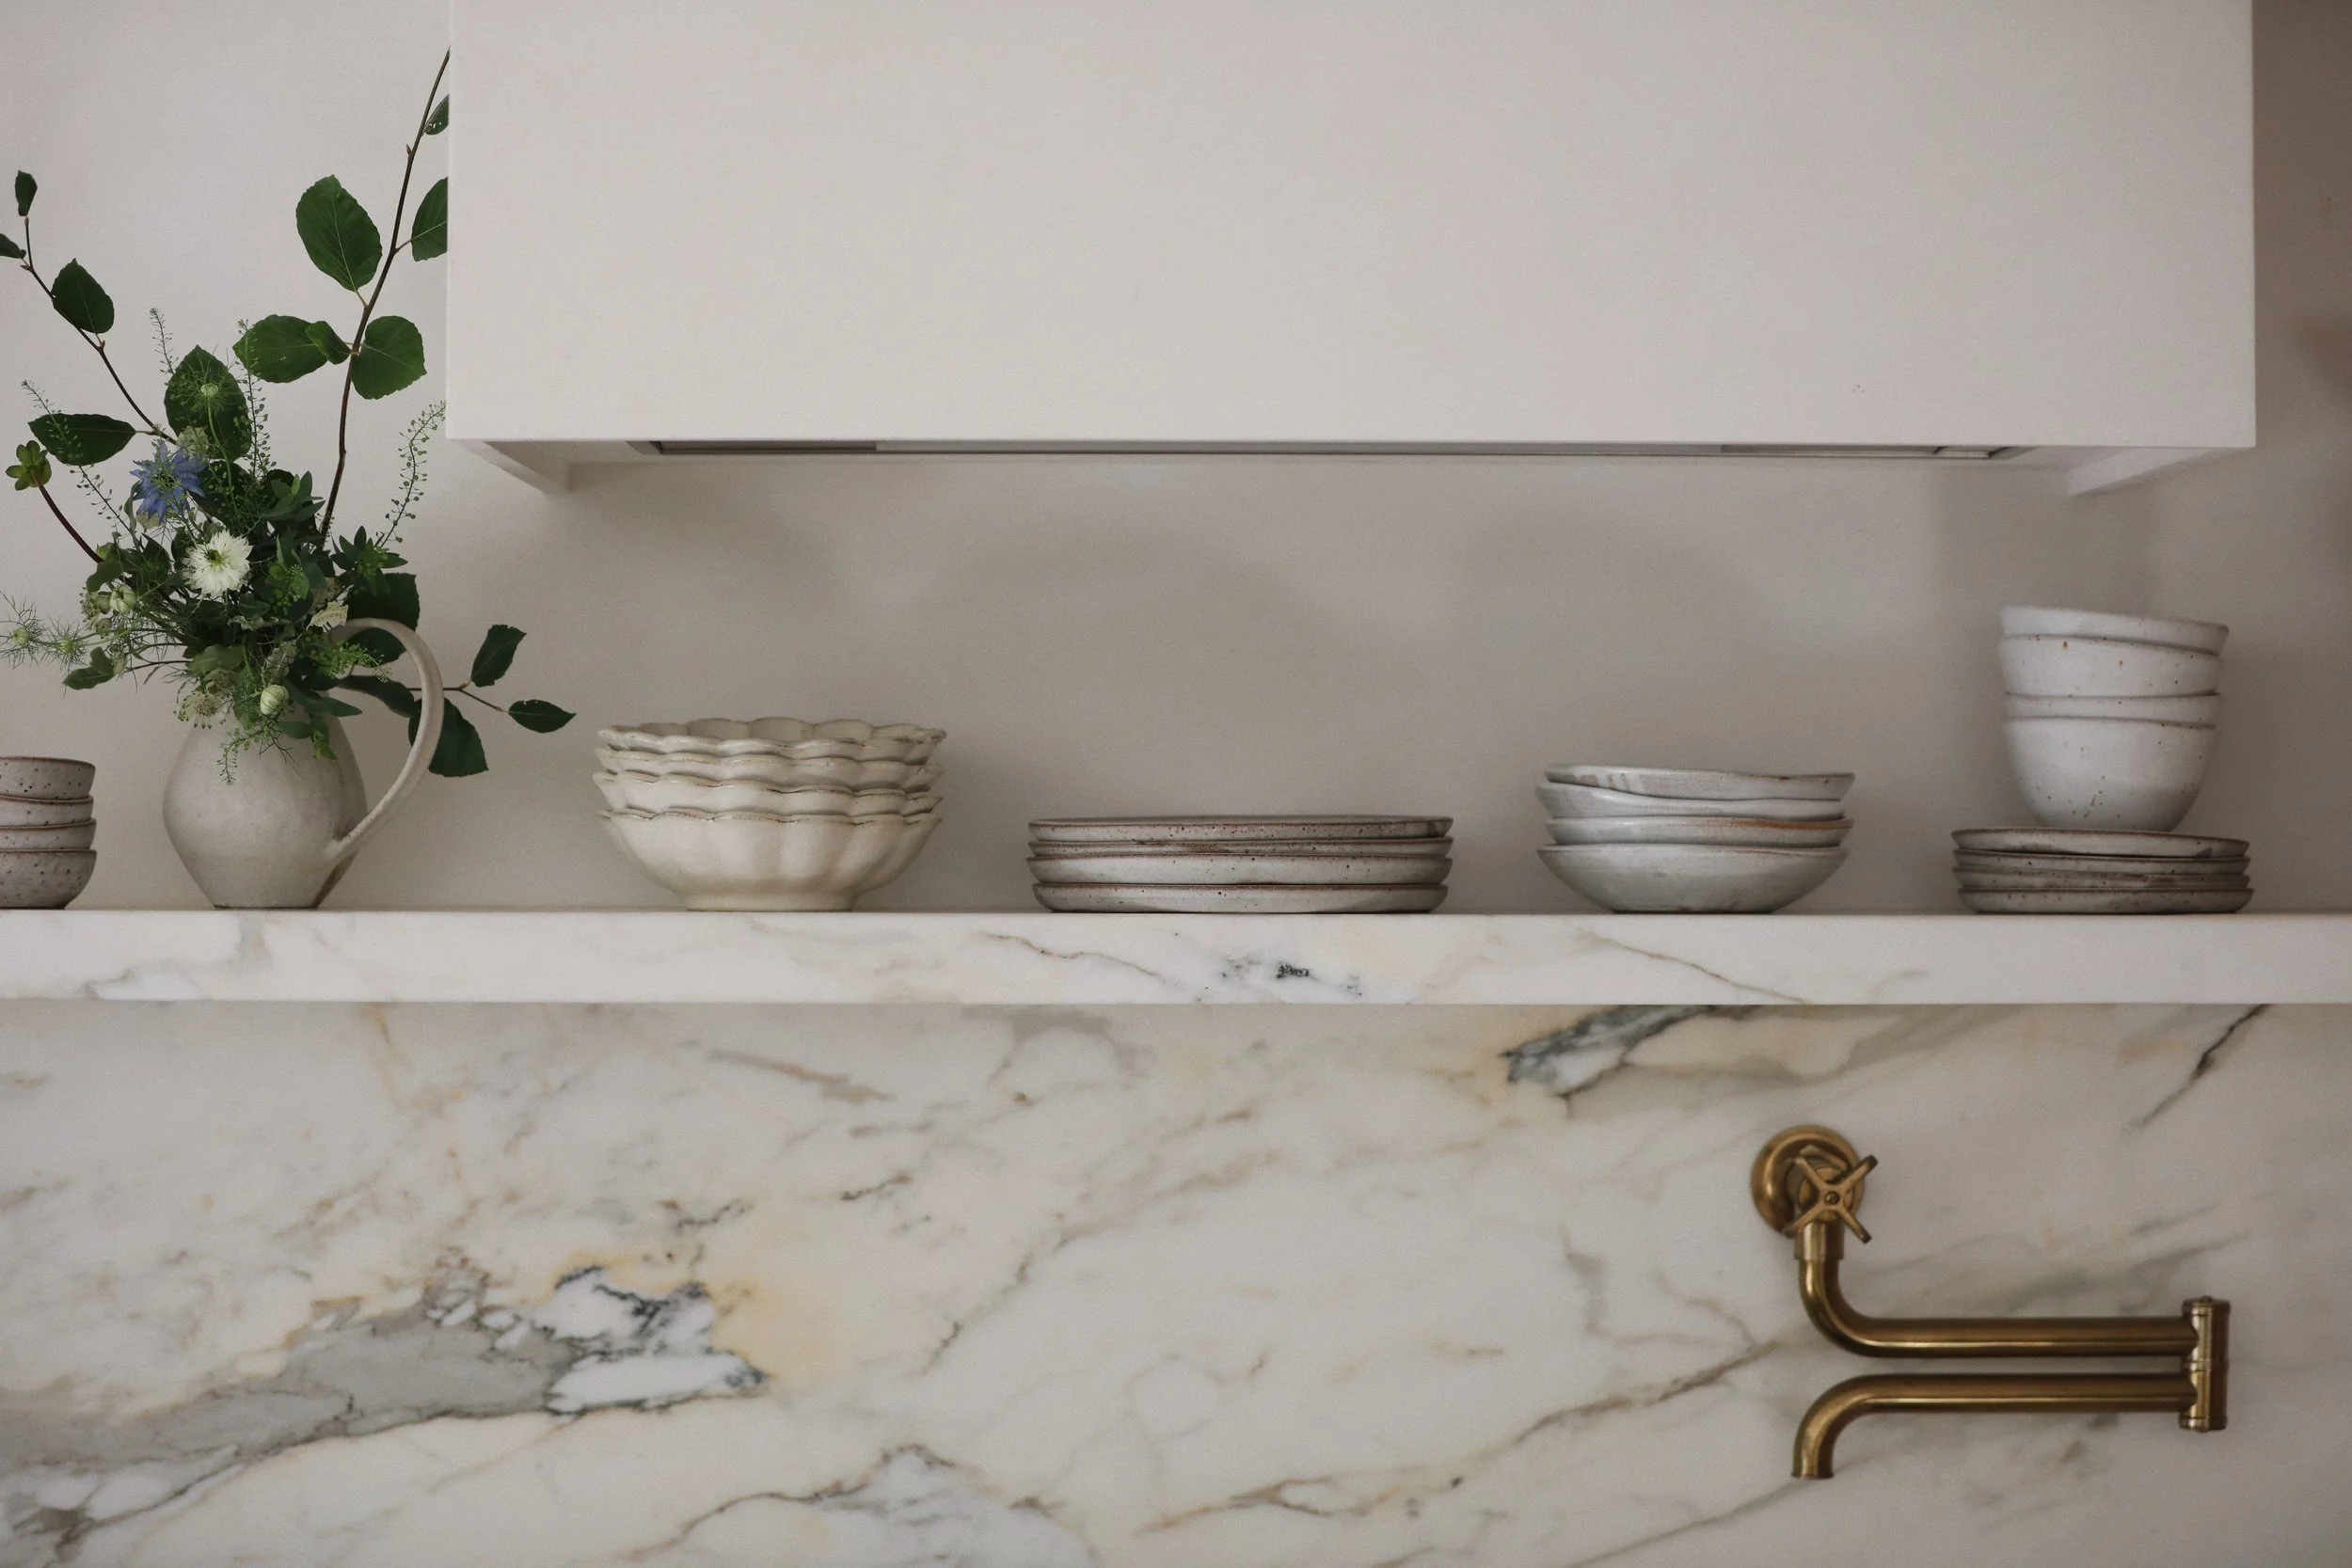
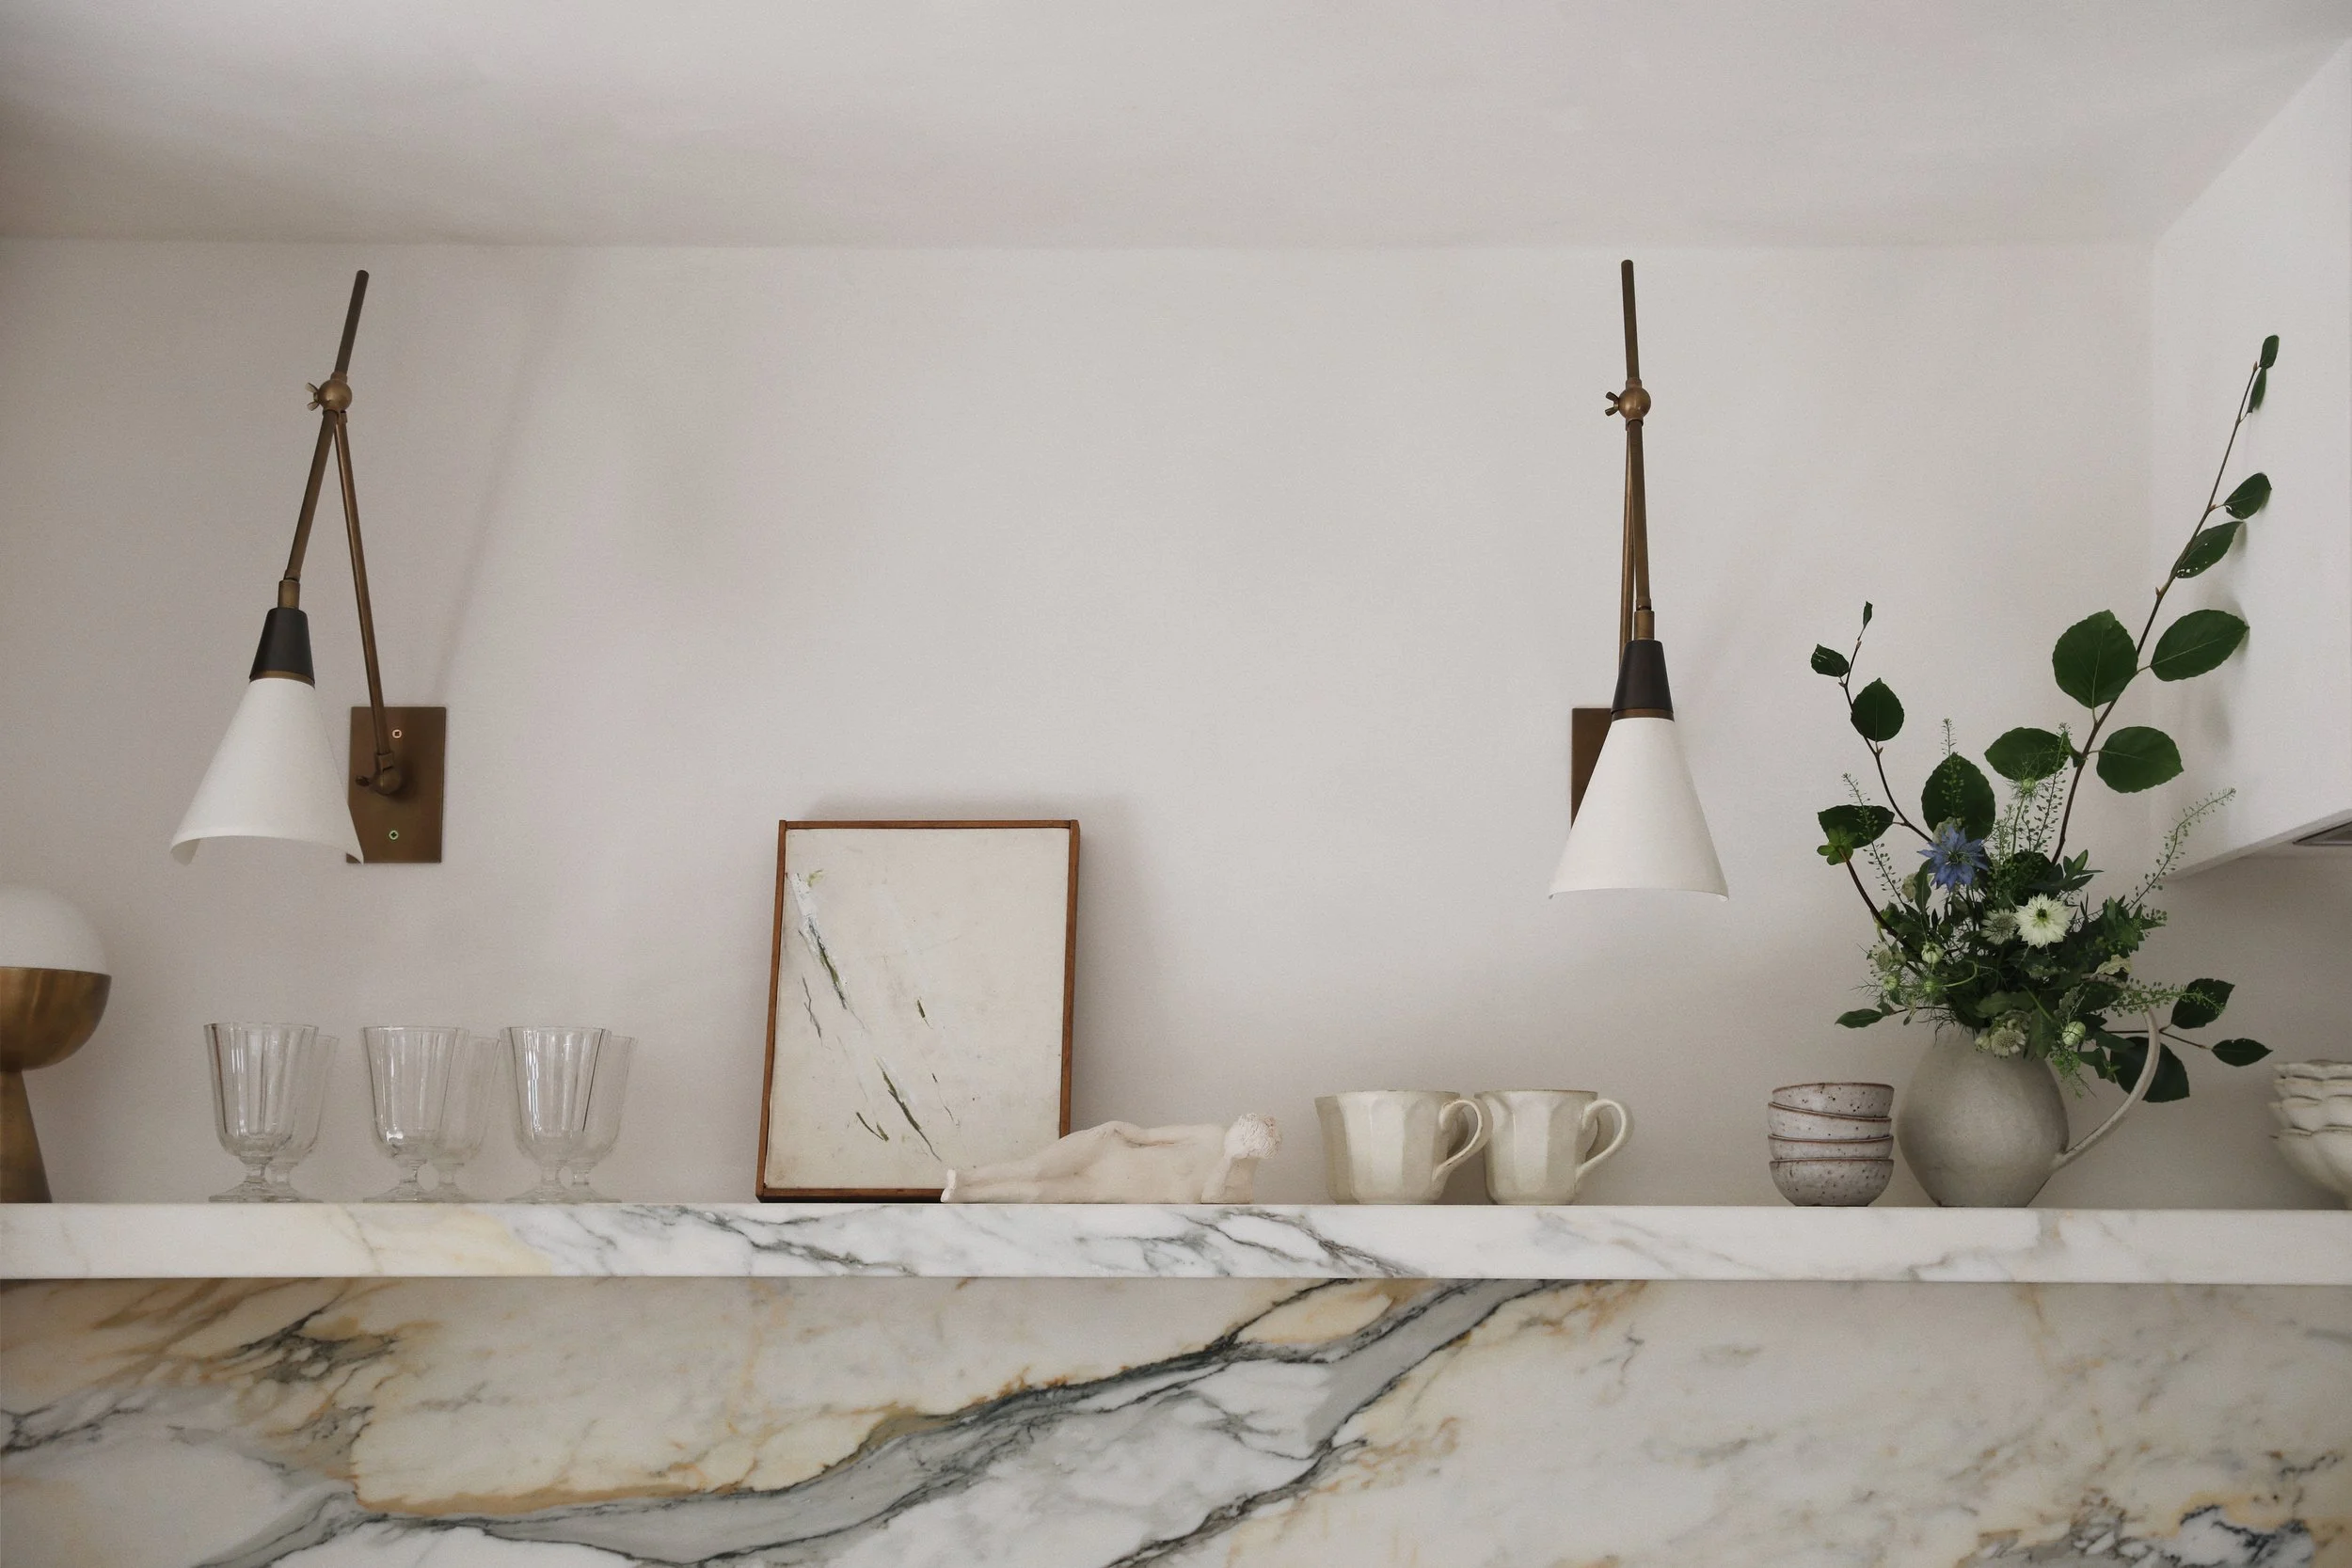
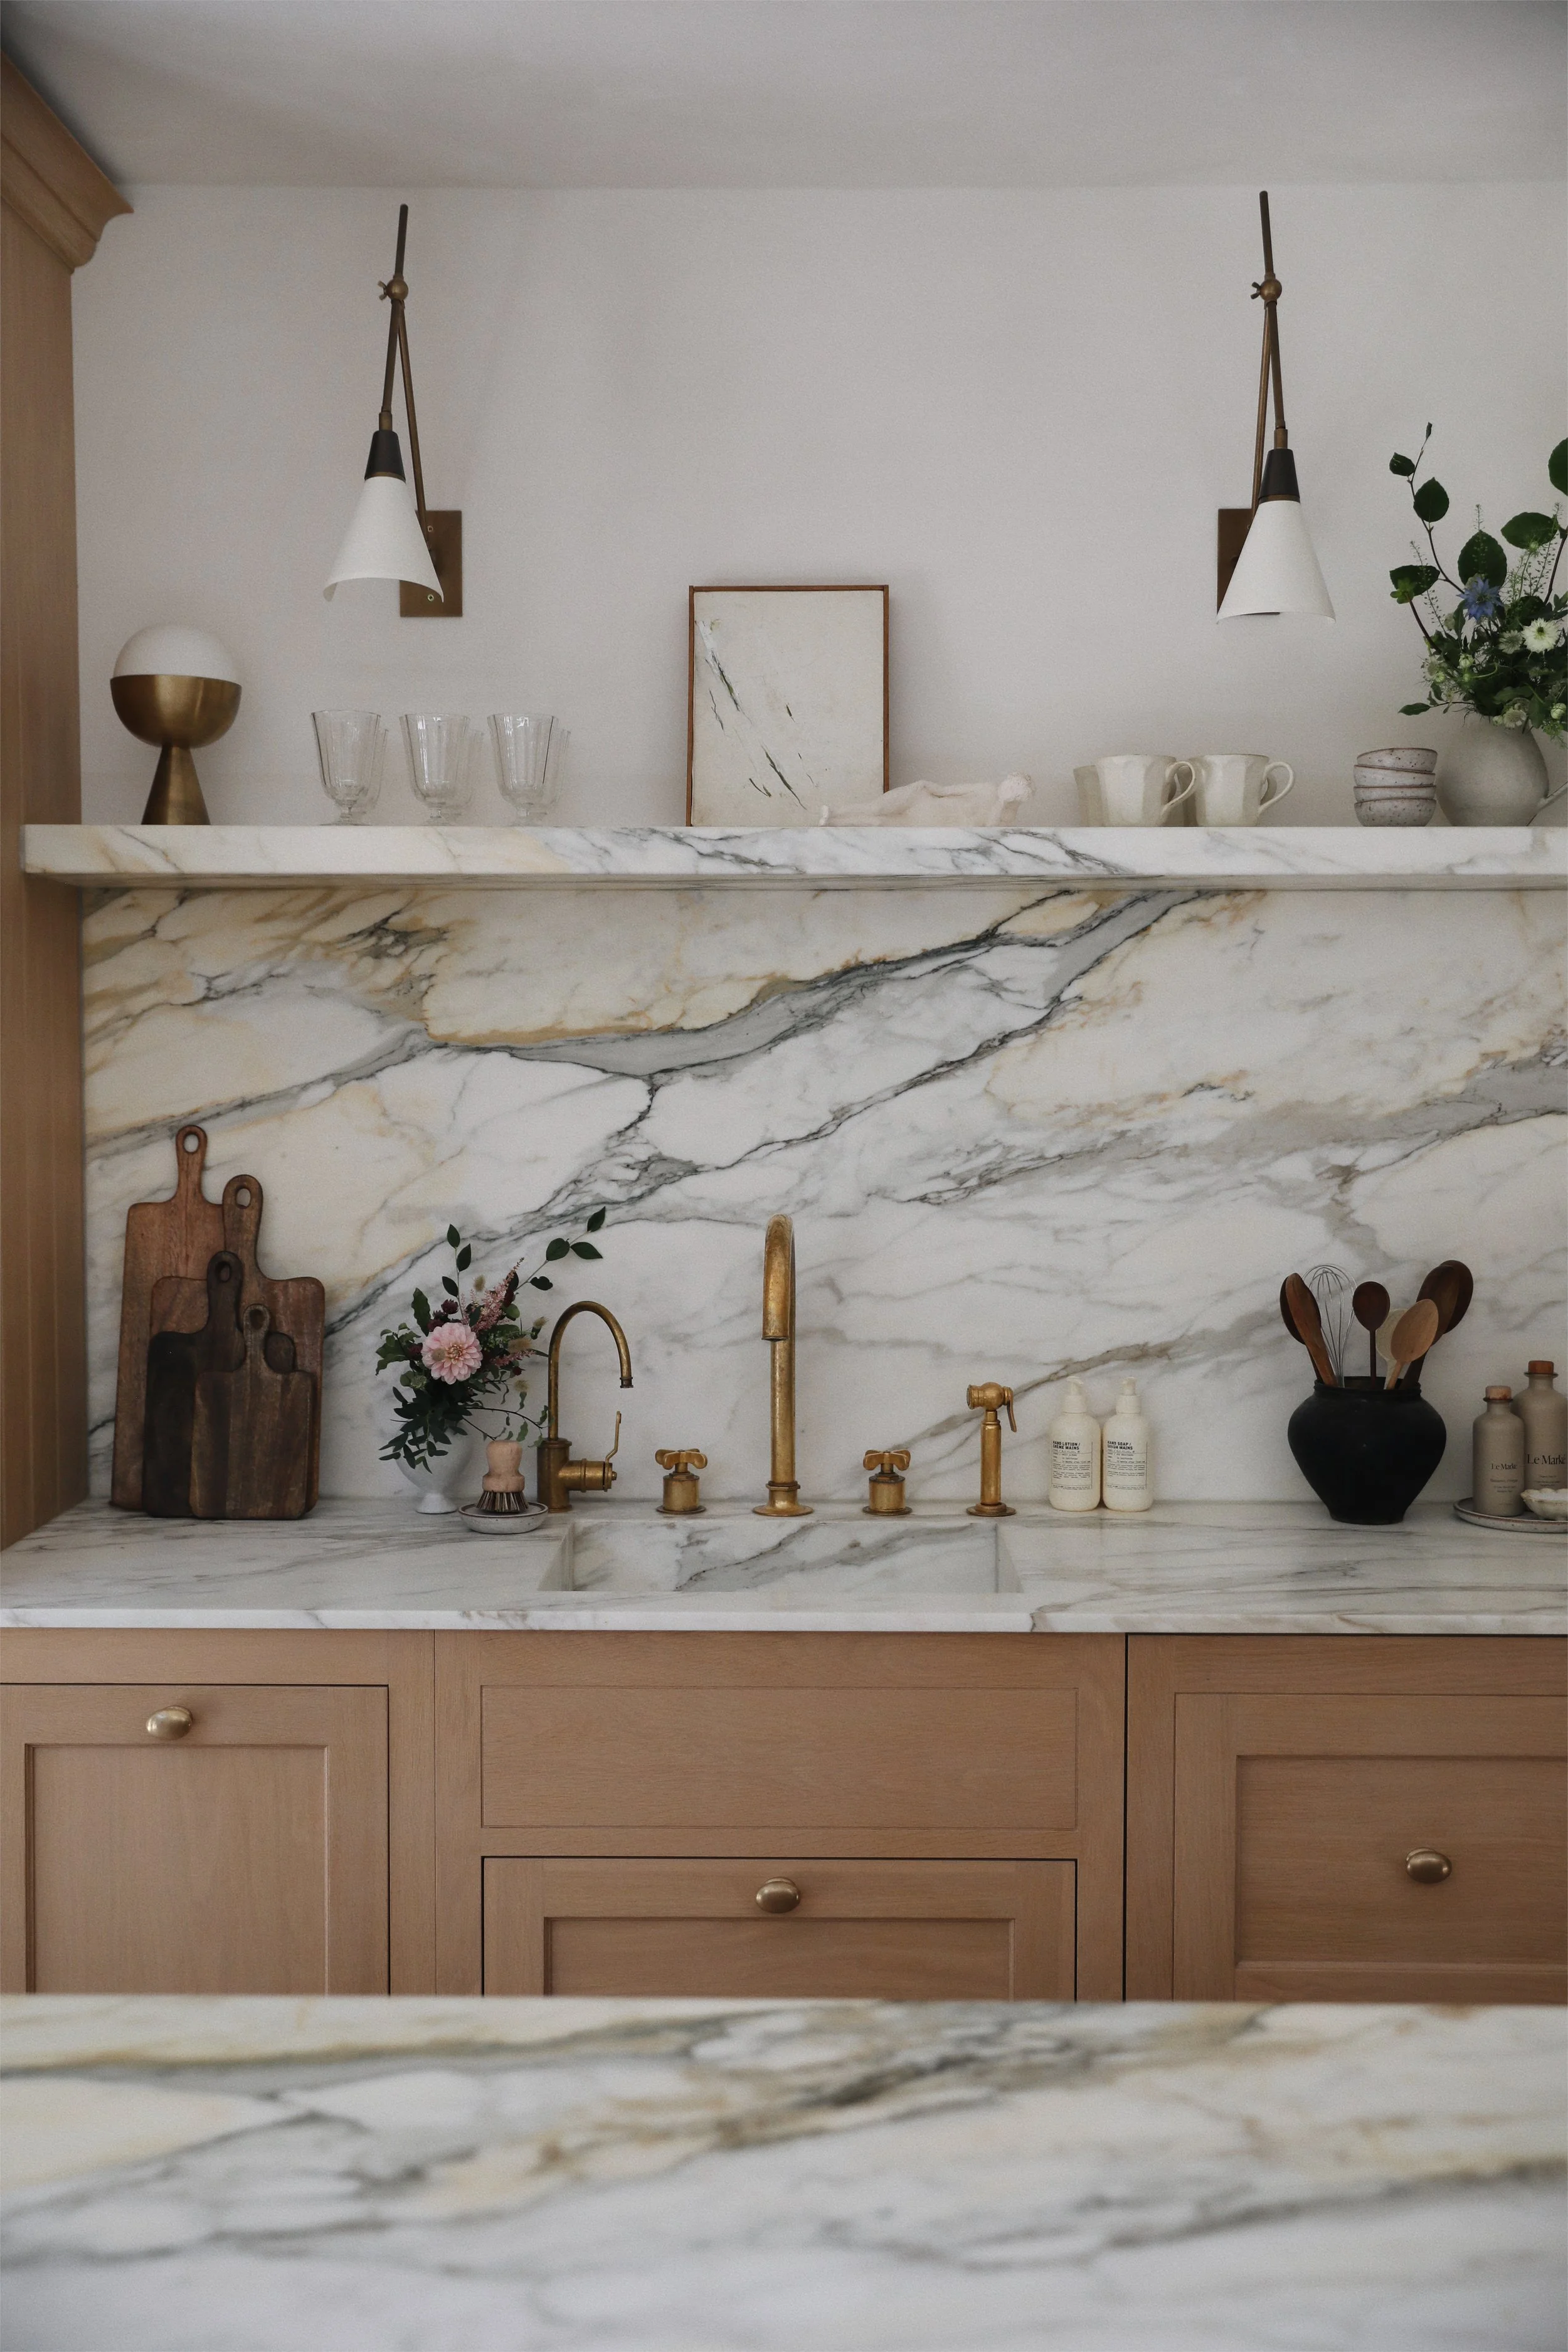
Marble has long been synonymous with luxury, timelessness and an undeniable touch of elegance. When we decided to incorporate a floating marble shelf into our kitchen, we chose marble not just for its beauty but for its ability to blend solidity with an ethereal quality. The result is a shelf that seems to defy gravity, appearing both substantial and weightless. While traditional shelving often fades into the background, this piece commands attention. It’s an artwork in its own right, a testament to thoughtful design and a functional sculpture that adds depth and character to our kitchen, whilst serving as a perfect display space for our curated collection of artisanal ceramics, glassware and culinary treasures.
Design, No.17 Design
Marble, Borghini Marble sourced from Imperial Stone Group
Fabrication & Installation, Middlesex Marble
Height, 76cm from countertop
Shelf Depth, 25cm
Length, 333cm
Shelf Thickness, 5cm
Height of Wall Lights Above Shelf, 34cm
Silicone Sealant Colour, Clear
As we mentioned earlier, good design often begins in the construction phase, particularly when structural support is required. Before you dive into the installation, it's important to take precise measurements to achieve the perfect fit for your floating marble shelf. Begin by determining the ideal length and depth and consider your practical and aesthetic needs. For example, if you plan to display dinner plates, you’ll need to ensure the depth of the shelf is generous enough to accommodate them.
Consult with your kitchen designers and build team to understand the precise dimensions of your units, then use a tape measure to carefully mark the dimensions on the wall, ensuring accuracy down to the millimetre. Though your marble fabricator will create a final template and survey before installation, those initial measurements are crucial for selecting the perfect slab of stone. Remember, precision is key to achieving a seamless, elevated look for your shelf.
Unlike traditional marble shelves that rely on simple brackets for support, floating marble shelves require sturdy wall reinforcements in order to withstand the weight of the marble. The design work for our shelf actually began behind the walls. Our contractors created a channel in the wall for a mammoth steel bracket, they then installed an L shaped steel bracket in the channel, fixed to the wall using multiple heavy duty steel bolts and strategically positioned to provide maximum support for the shelf. These brackets will not only enhance the structural integrity of your installation, but also ensure the safety and longevity of your floating marble shelf. Consult with a professional contractor or structural engineer to determine the optimal placement and configuration of the steel bracket. After checking everything was level, it was ready for the marble.


The heart of any floating marble shelf lies in the selection and fabrication of the marble itself, we opted for beautiful honed Borghini Stone that we sourced from Imperial Stone Group. Choose a high quality slab that complements the aesthetic of your kitchen, considering factors such as colour, veining and texture. For example we opted for warm toned marble with golden veins which paired perfectly with the warmth of our oak cabinetry. We’d always recommend opting for a honed stone finish for an elevated, design-led design.
Always enlist skilled marble fabricators who will cut, polish and finish the slab to perfection. It's essential to work with professionals who take pride in their craft and have the expertise and equipment necessary to handle delicate materials like marble with care and precision. We commissioned the amazing team at Middlesex Marble to fabricate and install our marble shelf, we also highly recommend JC Marble for installation.
With your measurements taken, walls reinforced and marble fabricated, it's time to bring your vision to life. The first piece of stone to be installed is the backsplash, the team carefully placed this in position before threading through our LED light strip. The adhesive for the backsplash is then left to set. Next they applied adhesive to the steel bracket and placed the underside of the marble shelf to the bracket before positioning the top piece of stone on top of the steel bracket. The top piece of stone was fabricated into an L shape, to provide an overhang giving the illusion of a thicker shelf, whilst creating a channel for the LED light strip to illuminate the surfaces below. We love to cook, so knew we needed light on our kitchen surfaces. The LED strip light wires were placed underneath the top slab of stone and fed through back to the wall to a dimmer switch we had installed in our kitchen pantry cupboard.


Always allow sufficient time for the stone to cure and bond securely to the steel. All of this to say, nothing is ever as easy as it seems. This all took some serious thought and engineering by both our contractor and Middlesex Marble to pull off — but wow, was it worth it.
With your floating marble shelf installed, it's time to showcase your creativity and adorn it with decorative accents that reflect your personal style and taste. Try to maintain that minimal sensibility, an open shelf can quickly appear cluttered and noisy, so remember less is more. Whether showcasing sculptural elements, displaying beautiful artwork, or arranging a curated collection of plates and jugs, the possibilities are endless and can always be reimagined once the foundation is there. Remember, experimentation is key, let your curiosity guide you and above all, enjoy the process. Your floating marble shelf is not just a striking feature or a functional element — it’s a canvas for your expression and creativity in the heart of your home.
Click here to explore a curated look at some of our favourite decorative items